

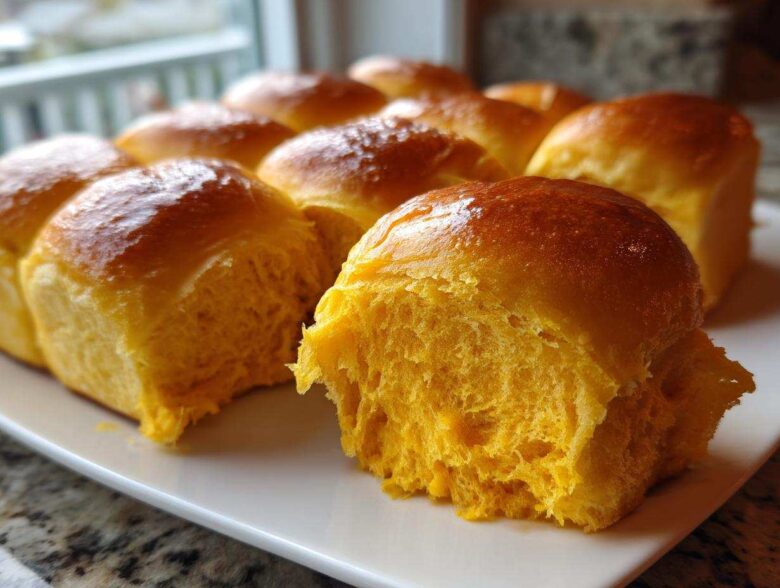
Oh, you know how I feel about bread, right? If it doesn’t practically dissolve the second it hits your tongue, I’m not interested! I’ve totally cracked the code on the ultimate dinner roll, and trust me, these sweet potato rolls are IT. They are ridiculously soft, unbelievably fluffy, and have just that perfect whisper of sweetness that makes everyone ask for the recipe. I spent nearly two years adjusting this recipe because I needed them to taste like they were made by three generations of bakers, not just me in my chaotic kitchen. You’ve got to try these for your next gathering—they truly redefine comfort food.
We actually go way back with this recipe at my house. I learned a lot from trial and error, and I even consulted some of the best baking wisdom I could find to make sure the science was sound. When you get them right, these rolls are so tender you almost don’t need butter, though I always add it anyway because, well, butter!
Why These Are the Best Sweet Potato Rolls You Will Make
Listen, folks who claim bread is complicated haven’t used sweet potato puree correctly. This isn’t just about color; the puree does some serious heavy lifting in keeping these rolls impossibly soft. That natural starch acts like a built-in moisture barrier, keeping them fresh for days. If you want the best holiday side dish, this is it.
- They are the definition of Fluffy Sweet Potato Rolls—seriously light!
- Unmatched softness that lasts; these stay fresh way longer than regular yeast rolls.
- They bake up perfectly golden brown every single time.
- We achieve truly Tender Yeast Rolls thanks to the fat content and puree blend.
Achieving That Soft Dinner Rolls Recipe Texture
The difference between a good roll and *this* roll is all about structure. Most recipes rely solely on butter, but the sweet potato puree actually gelatinizes slightly when baked. This slows down that staling process we all hate. It ensures that even when cooled, these stay pull-apart soft. Forget dry, crumbly sides; these are the luxurious rolls everyone fights over at the table.

Gathering Ingredients for Your Sweet Potato Rolls
Okay, now that you know why these rolls are a kitchen staple, let’s talk about what you need to grab! Making the best sweet potato rolls is truly about respecting what you put in. We’re keeping this list simple, but those details matter—especially when it comes to the temperature of your liquids and the texture of your main vegetable. Don’t rush this gathering stage; it sets up the whole dough for success!
I’ve been working with these exact measurements for years, and they always deliver that perfect, buttery bun texture. You’ll see that we need a little flexibility with the flour, too, because Mother Nature always has opinions about humidity, doesn’t she?
Ingredient Clarity and Preparation Notes
Let’s face it, yeast is picky, so we need to treat it nicely! Make sure your milk is warm, not hot—aim for that sweet spot between 105°F and 115°F on a thermometer. If it’s too cold, nothing happens. If it’s too hot, you kill the yeast, and then you’re just making sweet potato biscuits!
The mashed sweet potato is the star, and it *must* be completely smooth when you measure out that cup. Lumps mean uneven mixing, and that leads to weird pockets in your final bake. You want silky smooth results. When adding the flour, start with 3 1/2 cups. I always keep the last half cup nearby because whether your kitchen is humid or dry completely changes how much flour your dough demands to achieve that perfect consistency.
Step-by-Step Guide to Making Soft Dinner Rolls Recipe
Alright, let’s get our hands dirty! This is where the magic happens, turning simple pantry staples into glorious, pillowy soft rolls. This process might seem long, but honestly, most of that time is just waiting for the yeast to do its job. Just follow the rhythm, and you’ll have the best sweet potato rolls on the block.
Activating Yeast and Mixing the Dough for Sweet Potato Rolls
First things first—wake up that yeast! Whisk your 2 1/4 teaspoons of active dry yeast into that 1/2 cup of warm milk. It needs about five quiet little minutes to get foamy on top. That foam is proof that your yeast is happy and ready to bake. If it doesn’t foam, ditch the batch and start that step over; don’t skip it!
Once the milk looks cheerful, grab your big bowl. Mix in the mashed sweet potato, your sugar, the softened butter, the egg, and the salt first. Stir that all together until it’s nicely combined. Now, pour in that frothy yeast mixture. We mix our wet ingredients before the flour because we want everything happy and incorporated early on. Once that’s mixed, we start adding the flour slowly, about a cup at a time, until you see a shaggy kind of dough start to pull away from the sides of the bowl.
Kneading and First Rise for Tender Yeast Rolls
Time to turn it out onto a lightly floured workspace! This is where we turn that shaggy mess into something beautiful. You need to knead these sweet potato rolls dough balls for a solid six to eight minutes. You’re looking for elastic—when you poke it, it should slowly spring back. Don’t be tempted to dump in too much extra flour just because it’s a little sticky when you start! Pro Tip: Really work that dough through your hands; if you feel like you’re fighting it, you’re doing it right. That muscle work builds the structure for those fluffy results.
After kneading, put the dough into a bowl you’ve lightly oiled—just a tiny swirl around is fine. Pop it back in a spot that’s warm and free from drafts. Cover it up, and leave it alone for about an hour to an hour and a half. It needs to double in size so those wonderful yeast bubbles can expand!
Shaping and Second Proofing Your Sweet Potato Rolls
Once it’s doubled, gently give the dough a punch right in the middle—it lets out all that built-up gas. Now, divide that dough up evenly into 12 little portions. I usually eyeball it, but if you want perfect rolls, a kitchen scale is your friend here! Roll each piece tightly between your palms until you have a smooth ball. This tightening step is crucial for that beautiful, smooth top crust.
Tuck those 12 balls closely together in your greased 9×13 baking pan. Make sure they are touching just slightly so they grow up hugging each other—that’s how you get those perfect pull-apart edges. Cover the pan again and let them rest for their second rise. This proofing takes less time, maybe 30 to 45 minutes. You’ll know they’re ready when they look puffy and seem to have filled the gaps between them.
Baking and Finishing Your Homemade Sweet Potato Bread
Time to get that oven hot! Preheat it to 375°F (190°C). Before they go in, take that one remaining egg you set aside and beat it up really well. Use a pastry brush to lightly wash the tops of your puffy rolls. This egg wash gives us that gorgeous, deep golden color associated with excellent Homemade Sweet Potato Bread.
Bake them for around 18 to 22 minutes. Keep an eye on them from the 18-minute mark. You want them deep golden brown, not pale! The minute they come out of the oven, grab your leftover melted butter—yes, more butter!—and brush it right over the tops. This is the secret handshake for achieving maximum softness, turning them instantly into amazing Buttery Sweet Potato Buns. Let them cool for just five minutes before tearing them apart. Enjoy that steam!
Tips for Success with Your Sweet Potato Rolls
Baking is fun, but sometimes our dough doesn’t want to cooperate, right? Getting those perfect sweet potato rolls requires dodging a few common traps. I’ve learned the hard way what causes problems, so let me save you some heartache! Most hiccups happen right at the beginning or when handling the dough too much.
Troubleshooting Common Issues with Sweet Potato Rolls
If your dough won’t rise? Zip over to that yeast step! You either used milk that was way too cold, or maybe your yeast packet was ancient. Yeast needs warmth on its side, so don’t be shy about testing that milk temperature.
Now, if your rolls turn out dense instead of fluffy, nine times out of ten, it’s the flour. Did you scoop it right out of the bag with your measuring cup? That packs the flour in like concrete! Always spoon the flour into your measuring cup and level it off. Too much flour is the enemy of tenderness.
If you find yourself needing to toss this recipe (though you won’t, I promise!), remember you can check out my full baking disclaimer just in case things get weird in your oven. But follow the steps, use that sweet potato puree as your moisture insurance, and you’ll be pulling out amazing comfort food.
Variations on Classic Sweet Potato Rolls
While I absolutely adore this classic recipe for sweet potato rolls just the way it is—warm, soft, and slightly sweet—sometimes you want to shake things up, right? These rolls are so versatile, which is why they work so well for everything from Thanksgiving tables to random Tuesday dinners!
If you want to go savory, try adding some finely chopped fresh rosemary into the dough when you add the flour. That herbaceous touch pairs surprisingly well with the natural sweetness! That makes for fantastic Rosemary Sweet Potato Rolls.
If you’re feeling like dessert but still want that amazing dough base, you can pivot! After the first rise, instead of rolling them into dinner rolls, roll the dough out into a large rectangle. Slather it with softened butter, brown sugar, and cinnamon, roll it up tight, slice it, and boom—you have the base for amazing Sweet Potato Cinnamon Rolls. Just remember to increase the rising time a bit for those!
Serving Suggestions for Your Rolls for Holiday Dinner
These rolls are just screaming to be the star of your Holiday Dinner spread! Truly, they shine next to savory mains. Imagine one of these fluffy wonders soaking up gravy from roast turkey or beef—perfection! They offer that wonderful balance as a sweet Sweet Potato Side Dish without overpowering the main event.
But don’t forget the sweet side! A smear of maple butter or a drizzle of honey right after they come out of the oven is unbeatable. They’re perfect for mopping up leftover cranberry sauce, too. Honestly, I usually bake an extra batch because they disappear before the turkey even hits the table!
Storage and Reheating Instructions for Sweet Potato Rolls
If you manage to have any leftover sweet potato rolls—and that’s saying something because my family devours them—you want to make sure they keep that heavenly softness. They honestly taste better the next day, provided you store them right! Don’t even think about leaving them uncovered on the counter; they’ll dry out faster than you can say, “Pass the butter.”
For short-term storage, keep them in a sturdy zip-top bag or an airtight container at room temperature. They honestly hang out nicely for three or four days this way. The sweetness and moisture from the puree really help them last without getting stale quickly.
Freezing Your Homemade Sweet Potato Bread
If I know we won’t eat them all right away, I always freeze them. Here’s my trick: let the rolls cool completely first. Putting warm rolls into the freezer traps moisture, and trust me, that leads to weird icing or soggy spots. Once they’re totally room temperature, wrap the batch tightly in plastic wrap—really cocoon them—and then tuck that whole package into a freezer bag. They freeze perfectly for up to three months!
Restoring Softness When Reheating
Thawing is simple: just toss them on the counter for a few hours if they’re frozen solid. Now, for the magic reheat! You want them hot and soft, right? Don’t reach for that microwave first; it makes them tough. Instead, wrap the rolls you want to eat loosely in aluminum foil—maybe with a tiny pat of butter nestled on top for extra steam power.
Pop that foil packet into a 350°F oven for about 10 minutes. That gentle heat warms them all the way through and brings back that just-baked tenderness. If you’re in a crazy hurry, a 15-second zap in the microwave might work on a single roll, but honestly, the oven restores the texture of these sweet potato rolls so much better. Serve them warm with honey butter, and enjoy the leftovers!
Frequently Asked Questions About Making Sweet Potato Rolls
I get so many questions about these rolls! Since I’ve made this batch more times than I can count, I figured I’d just answer the most common things folks ask me immediately. Hopefully, this helps you feel confident about whipping up the best sweet potato rolls!
Can I use canned sweet potato puree instead of fresh for these sweet potato rolls?
Yes, absolutely you can! I know sometimes life is busy, and peeling and boiling a whole sweet potato just isn’t happening. If you use canned puree, just be super careful! Look closely at the ingredients for the can you buy. If it lists sugar, water, or anything other than just sweet potato, you need to adjust. If it has added water, you might need to cut back slightly on the milk, or your dough will be too wet. If it’s pure, unsweetened puree, it works beautifully as a substitute for the fresh mashed potato.
What is the best way to get ‘Easy Sweet Potato Dinner Rolls’ if I am short on time?
If you’re short on time, the mixer is your new best friend! While I love kneading by hand and feel it builds the best texture for these Tender Yeast Rolls, if you have a stand mixer with a dough hook, use it! It reduces the kneading time from about 7 minutes by hand down to maybe 4 or 5 minutes on medium speed. That saves a little bit of workout time!
Another trick for speed is making sure your kitchen is genuinely warm for the rise. Try putting the bowl in your oven with *just* the light on—it creates a perfect little tropical environment for the yeast. If you are absolutely desperate, you can slightly increase that yeast to three teaspoons total, but I warn you, it can sometimes give the rolls a slightly noticeable yeasty flavor, which we want to avoid in our sweet rolls!
If you need to get in touch with me about other baking dilemmas, feel free to reach out on my contact page!
Estimated Nutritional Data for Sweet Potato Rolls
Now, I know some of you lovely bakers are tracking everything, so I wanted to give you a general idea of what’s in these wonderful treats. Remember, I’m a home cook, not a lab technician! These numbers are just estimates based on the recipe ingredients I used as a baseline. If you use extra butter in your egg wash (and who could blame you?), or if your tablespoon of sugar is a little extra heaping, the final count will shift a tiny bit. Consider this your jumping-off point!
I pulled these figures together based on a 12-roll yield. They are certainly a treat, but they are packed with that lovely, complex carb energy from the sweet potato, which is way better than plain white fluff! Please know that the ingredients we use—like the brand of flour or the exact amount of sugar absorbed—will make a difference. Feel free to check out my full policies if you need more reading material!
Here is what you can generally expect per serving (one roll):
- Calories: Approximately 220
- Fat: Around 8g
- Carbohydrates: Roughly 35g
- Protein: About 5g
They also clock in with about 6 grams of sugar, which comes naturally from the sweet potatoes mixed with the added sugar we use to feed the yeast. They’ve got a little bit of fiber in there too, which is a bonus when you’re enjoying such a decadent side dish!
PrintSoft Sweet Potato Dinner Rolls

A recipe for soft, fluffy dinner rolls made with sweet potato puree, perfect for holiday meals or any dinner.
- Prep Time: 30 min
- Cook Time: 22 min
- Total Time: 127 min
- Yield: 12 rolls
- Category: Side Dish
- Method: Baking
- Cuisine: American
- Diet: Vegetarian
Ingredients
- 1 cup mashed sweet potato (about 1 large sweet potato)
- 1/2 cup warm milk (105-115°F)
- 2 1/4 teaspoons active dry yeast
- 1/4 cup granulated sugar
- 1/2 cup (1 stick) unsalted butter, softened
- 1 large egg
- 1 teaspoon salt
- 3 1/2 to 4 cups all-purpose flour
- 1 egg, beaten (for egg wash)
Instructions
- Combine the warm milk and yeast in a small bowl. Let stand for 5 minutes until foamy.
- In a large bowl, mix the mashed sweet potato, sugar, softened butter, egg, and salt. Add the yeast mixture and stir until combined.
- Gradually add the flour, one cup at a time, mixing until a shaggy dough forms.
- Turn the dough out onto a lightly floured surface. Knead for 6 to 8 minutes until the dough is smooth and elastic. Add small amounts of flour if the dough is too sticky.
- Place the dough in a lightly oiled bowl, turning to coat. Cover the bowl with plastic wrap and let it rise in a warm place for 1 to 1.5 hours, or until doubled in size.
- Punch the dough down gently. Divide the dough into 12 equal pieces. Roll each piece into a smooth ball.
- Place the dough balls close together in a greased 9×13 inch baking pan. Cover and let rise again for 30 to 45 minutes, or until puffy.
- Preheat your oven to 375°F (190°C). Brush the tops of the rolls lightly with the beaten egg wash.
- Bake for 18 to 22 minutes, or until the tops are golden brown.
- Remove from the oven. Brush the tops immediately with melted butter for extra softness, if desired. Serve warm.
Notes
- For the best texture, use fresh, active yeast.
- If you prefer a richer flavor, substitute half of the all-purpose flour with bread flour.
- To make the sweet potato puree, bake or boil the sweet potato until very soft, then mash thoroughly.
Nutrition
- Serving Size: 1 roll
- Calories: 220
- Sugar: 6
- Sodium: 250
- Fat: 8
- Saturated Fat: 5
- Unsaturated Fat: 3
- Trans Fat: 0
- Carbohydrates: 35
- Fiber: 2
- Protein: 5
- Cholesterol: 30