

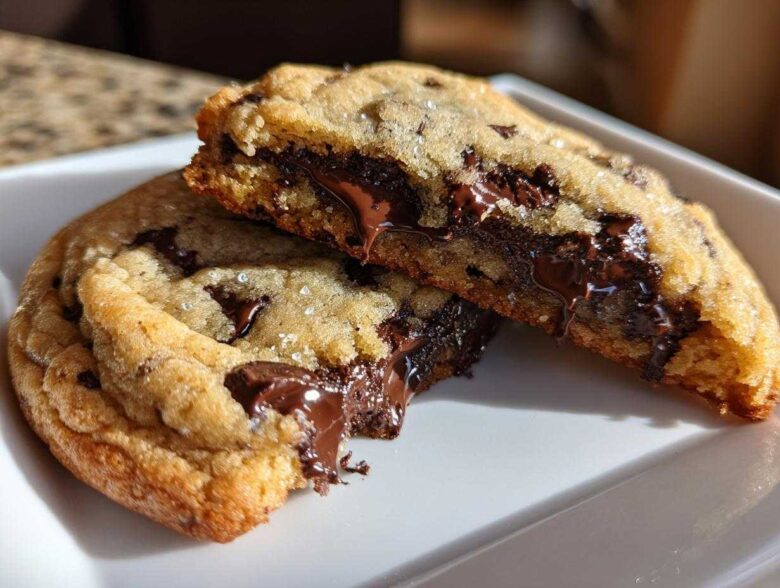
Oh my gosh, you are going to LOVE these cookies. I’m talking about the kind of cookie you fight for at the bakery counter—thick, deep, chewy centers, and those perfect lacey, crispy edges. For years, I thought I was cursed; every batch of chocolate chip cookie dough I made spread into sad, paper-thin puddles. It was heartbreaking! But don’t you worry about that mess anymore. Today, I’m handing over the blueprint for what I maniacally call the Ultimate Brown Butter Bakery-Style Chocolate Chip Cookies. This recipe is my absolute go-to, and trust me, the secret sauce is all in that nutty, deeply flavored brown butter!
If you’re looking for a quick dessert that tastes like you spent all day perfecting it, this is it. We’re making homemade cookies that blow those grocery store ones out of the water, from scratch, and honestly, the process is way easier than you think once you know the tricks. Come on back into the kitchen—we’re about to redefine your favorite classic chocolate chip recipe.
Why This is the Ultimate Chocolate Chip Cookie Recipe
I’ve tried hundreds of recipes trying to hide the fact that I was just using one stick of butter, but those days are over! This isn’t just another recipe; this is a promise. If you follow these steps, you are done searching for the best chocolate chip cookie recipe out there. We’ve solved all the common pitfalls that lead to sad, flat cookies.
- Thick and Chewy Centers: We manage the spread so your cookies stay proud and tall.
- Crispy Edges: The balance of sugars and fat creates those irresistible lacy, crisp borders.
- Deep Flavor: The brown butter adds this incredible, toffee-like depth that elevates the whole thing. You won’t go back to plain butter, I promise!
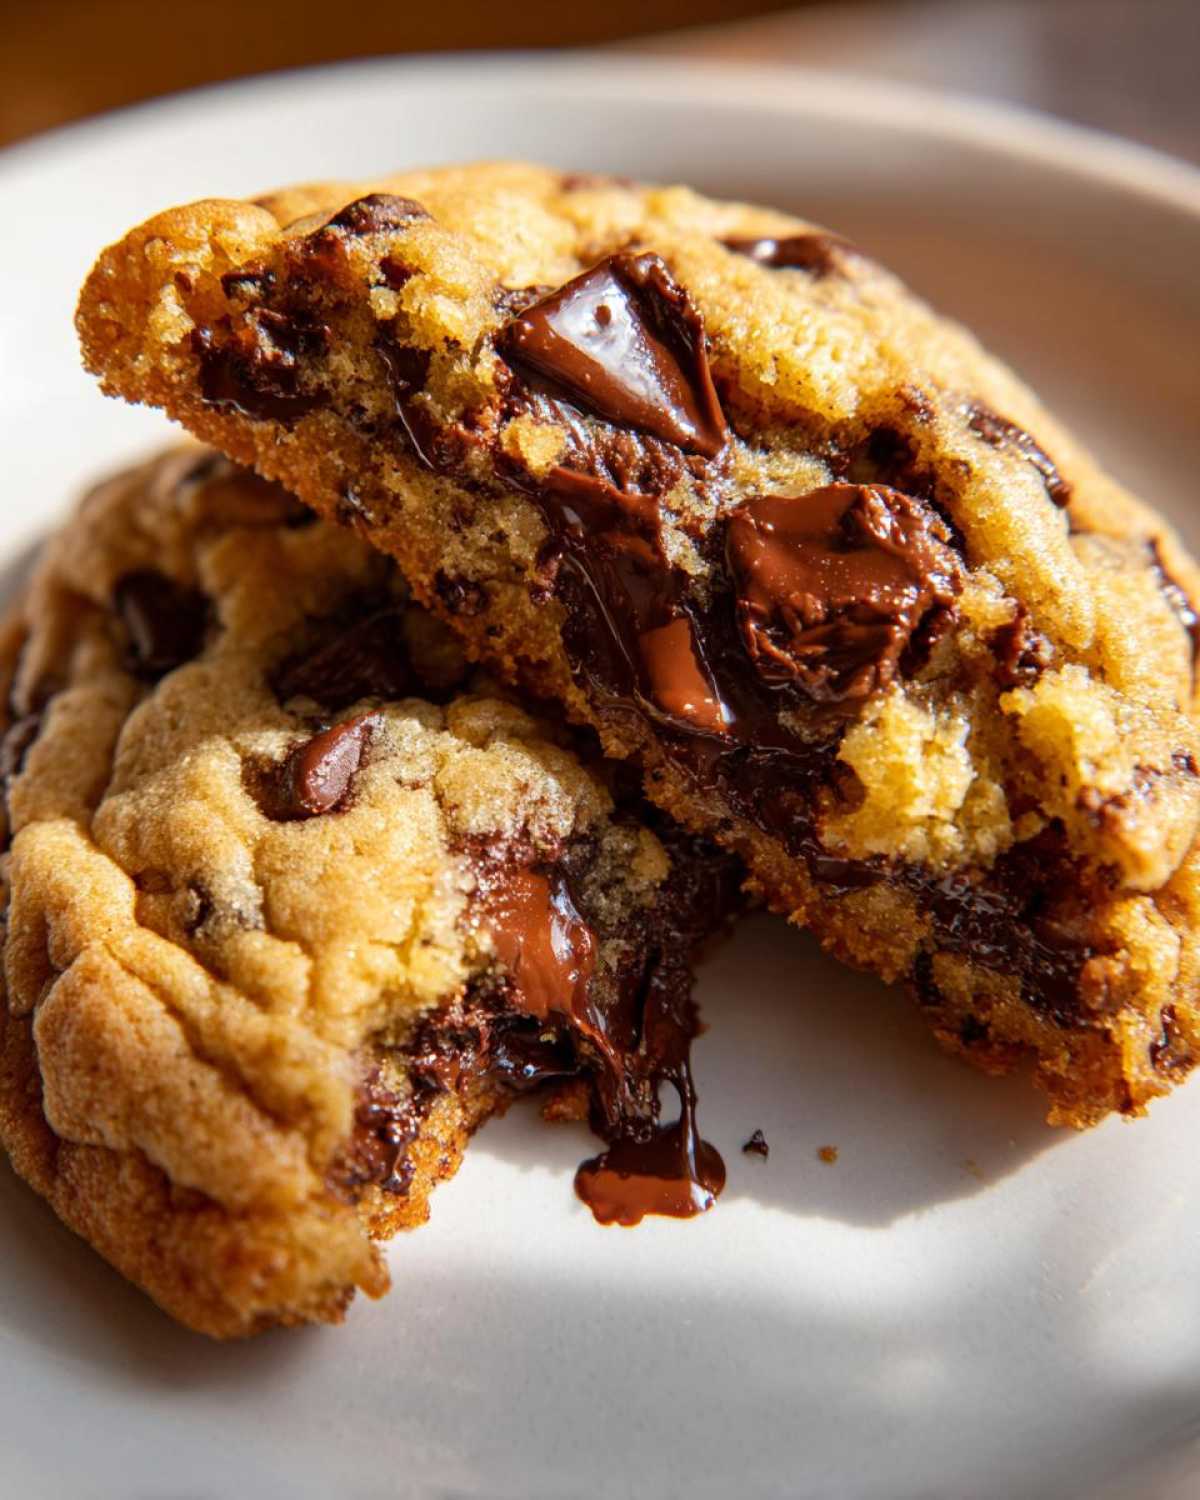
- Gooey Pockets: Using a chocolate chunk/chip mix ensures you get melty pockets everywhere without the whole thing turning into one boring brown square.
These are truly what I consider the perfect chocolate chip cookies.
Achieving Bakery Style Cookies Texture
The texture is where most people get tripped up, but it’s simple physics, really! First, the brown butter helps create a different internal structure when it cools down slightly before the eggs go in. Second, and this is non-negotiable for those amazing bakery style cookies? You have to chill the dough. Seriously, don’t even think about scooping it warm from the mixer. Chilling allows the flour to fully hydrate and keeps the fat solid enough so the dough doesn’t melt instantly in the oven. That’s the secret to height and chewiness!
Ingredients for Your Brown Butter Chocolate Chip Cookie
Okay, let’s talk about what you need for these champions. Since we’re putting the butter through a little transformation, you absolutely want to use a good quality, unsalted butter here. That nutty, toasty flavor depends on the butter doing its job perfectly! You’ll need the full two sticks (that’s one cup) to get enough brown butter goodness.
For the sweetness profile, I insist on using mostly light brown sugar—one whole cup packed—because that molasses is what gives us depth and moisture. We balance that with a half cup of regular white granulated sugar for those crispy edges. You’ll also need two large eggs; make sure they are at room temperature if you can, it helps them mix in better! And don’t skimp on the vanilla; a full tablespoon makes a huge difference in the final aroma of your homemade cookies easy.
The dry stuff is simple: 2 1/4 cups of all-purpose flour, a teaspoon each of baking soda and salt. But the real stars, of course, are the chips. I use a mix—about a cup and a half of semi-sweet chips and a half cup of milk chocolate chunks. This combination gives you the best texture.
Ingredient Notes and Substitutions for Chocolate Chip Cookie Dough
Chocolate is crucial if you want those gorgeous, melted pools in your gooey chocolate chip cookies. Chips hold their shape a bit more, but the chunks melt into lava flows—you need both! Please don’t try to substitute the brown butter with just melted butter; you’ll lose that deep, toffee flavor that makes this recipe famous.
If you were to absolutely have to swap the sugar, try to keep the brown sugar ratio high, even if you use coconut sugar instead of white. When it comes to flour, stick to all-purpose for structural integrity to keep these thick and chewy cookies nice and lofty. Anything lighter, like cake flour, will probably make them collapse on you!
Step-by-Step Instructions for Perfect Chocolate Chip Cookies
This is where the magic happens, but you have to follow the sequence exactly! If you rush the cooling of the brown butter or skip the chilling, you’ll end up with my old, flat, sad cookies. We are making something brilliant here, so take your time, especially in the first few steps. Remember, this whole process is designed to give you that high-end, bakery feel, making it a real no fail cookie recipe if you stick to the plan.
Mastering the Brown Butter Technique for Your Chocolate Chip Cookie
First things first: we melt that butter over medium heat. Don’t walk away! You’ll see it foam up, and then, usually around the 5-to-7-minute mark, you’ll see little brown bits start to form at the bottom of the pan. That’s the goal! It should smell powerfully nutty and toasted—like caramel popcorn, but buttery. As soon as you smell that deep toasted aroma, kill the heat and pour the butter (bits and all!) into a proper heatproof bowl. You must let this cool for at least 15 minutes before moving on. If it’s too hot, it’ll cook your eggs, and we don’t want that!
Chilling and Scooping for Thick and Chewy Cookies
Once everything is mixed—your cooled brown butter, the sugars, eggs, vanilla, and then your dry ingredients folded in gently—it’s time for the most important waiting game ever. Cover that glorious bowl of chocolate chip cookie dough and put it in the fridge for a minimum of two hours. I really push for overnight, honestly! This chilling time is the hero that stops your cookies from spreading into lace doilies across the pan. Seriously, it’s what gives you those lovely **thick and chewy cookies**.
When you’re ready to bake, preheat that oven to 375 degrees F. Scoop out nice rounded tablespoons of the cold dough onto your parchment-lined sheet, leaving plenty of space between them. Here’s a fun trick for extra visual appeal: take six or seven extra chocolate chips and gently press them right on top of each dough ball before they go in. They bake right onto the surface and look stunning!
Best Cookie Baking Tips for Ultimate Chocolate Chip Cookie Results
Even with the best recipe, sometimes you need a little nudge to get those **perfect chocolate chip cookies**! If your cookies are baking too fast, try baking them on the middle rack. This keeps the heat more consistent around the entire cookie, helping the center set while preventing scorching.
Another one of my top **best cookie baking tips** is how you handle the aftermath. As soon as those cookies come out of the oven—and I mean *immediately*—take a round cookie cutter (or a wide glass rim) that is slightly bigger than the cookie itself. Gently slide it around the edges of the hot cookie and give it a little wiggle. This trick forces the edges into a perfect circle right as they start to firm up, making them look totally professional.
If your cookies cool down and feel a bit too crunchy the next day, don’t panic! Pop one or two on a microwave-safe plate and give it a 7-to-10-second blast. They go right back to being warm and soft in the middle, guaranteed!
Making Homemade Cookies Easy: Prep and Make-Ahead Advice
The real beauty of this recipe, besides the taste, is how flexible it is for busy weeknights! While this dough is amazing fresh, it really excels when you plan ahead. If you’re just making a batch but don’t want to bake right away, just treat that covered bowl of dough like gold in the fridge. I have happily kept this dough refrigerated for up to five days—yes, five days! The flavor actually deepens a little more overnight, so it’s never a downgrade.
But my favorite trick for true **homemade cookies easy** access? Freezing the dough! I scoop my dough balls (about 2 heaping tablespoons each) onto a parchment-lined baking sheet *before* I chill them for the required two hours. Once they are rock hard, I toss those frozen balls into a heavy-duty zip-top bag. I’ve kept pre-scooped balls in my deep freezer for nearly three months, and they bake up just as thick and delicious as the fresh batch.
When the craving hits and you have frozen dough balls, you don’t even need to thaw them! Just pull out exactly how many you want, place them on your prepared baking sheet, and add about 2 or 3 extra minutes to the baking time listed in the instructions. It’s fantastic for impromptu celebrations or just keeping that fresh-baked smell ready to go!
Storing and Reheating Your Gooey Chocolate Chip Cookies
These are America’s favorite cookie for a reason, and luckily, they are actually pretty great for leftovers—though let’s be honest, there rarely are any leftovers! When you do manage to save some, storage is super important if you want to keep that soft, **gooey chocolate chip cookies** texture.
First rule: Never store them in the fridge! That cold air is the enemy of a soft center and will suck all the wonderful buttery moisture right out. You want an airtight container on your countertop at room temperature. If they are stacked, pop a small square of wax paper between the layers. This keeps them from sticking together and getting smooshed!
Now, if your cookies have sat out for a day or two and they’ve firmed up a little too much? Don’t worry, we can bring them back to life! The absolute quickest fix is the microwave. Place one or two cookies on a paper towel, zap it for about 7 to 10 seconds—no more—and they will be warm, soft, and melty again. You have to eat it fast, though, because they firm up quick once they cool down from the microwave!
For larger batches, I prefer the low-oven method. Preheat your oven to a very gentle 300 degrees F. Place the cookies on a baking sheet and warm them up for about 4 to 5 minutes. This warms them all the way through evenly, bringing that buttery flavor back without drying them out. It’s perfect if you want that fresh-out-of-the-oven feel again!
Frequently Asked Questions About the Chocolate Chip Cookie Recipe
It’s totally normal to have questions when you are leveling up your baking game! I get asked pretty much the same things over and over when people first try this recipe because they want to make sure they get those **perfect chocolate chip cookies** I keep raving about. Here are the top three things I hear most often when people are making their first batch of these amazing, **buttery chocolate chip cookies**.
Can I substitute the brown butter in this chocolate chip cookie recipe?
Look, I’m going to be honest with you: yes, you *can* skip browning the butter, but don’t expect the same results. The whole point of this recipe being the “Ultimate” version is that nutty, incredible depth of flavor that only comes from toasting those milk solids. If you skip it, you’ll end up with a very good, standard cookie, but it won’t have that signature flavor that makes everyone ask for the recipe.
If you are really in a rush, you can just use melted butter instead of brown butter. Just milk the butter until it’s fully melted—no cooking needed—let it cool until it’s just warm to the touch (not hot!), and proceed with the recipe. It’s better than using soft butter if you’re in a hurry, but promise me you’ll try the brown butter method next time! Visit my contact page and let me know when you do!
What makes these ‘bakery style cookies’ so thick?
The thickness is a triple threat, really, but two things are the heavy hitters! The number one reason is that essential **chilling time** we talked about. If the dough is cold, it can’t spread rapidly in the heat, so it bakes up tall and chewy instead of thin and crispy. That slow, controlled melt is what defines those **bakery style cookies**.
Secondly, it’s the ratio of fats to sugars to flour. We use slightly more brown sugar than white sugar, and we include enough flour to hold that structure. When you cream the cooled, brown butter properly with that brown sugar, you incorporate just the right amount of air to prevent it from being completely flat while still giving you that dense, satisfying bite! It’s truly the recipe for **thick and chewy cookies**.
What kind of chocolate is best for these cookies?
Forget what the bag says—the best approach for any **chocolate chip cookie** in my book is mixing things up! If you just use standard semi-sweet chips, you’ll get plenty of chocolate flavor, but the texture is kind of uniform. I strongly recommend using 75% chips (which hold their shape better) and 25% chunks.
The chunks have higher fat content, which means they melt into those fantastic, runny pockets of glorious chocolate when the cookie is warm. Nothing makes a cookie look more luscious than those big, melted puddles when you break it apart. Don’t be afraid to use dark chocolate chunks if you like a little bitterness to cut the sweetness, too!
Estimated Nutritional Data for One Chocolate Chip Cookie
I always get asked about the breakdown for these beauties, especially since we are using brown butter and a generous amount of chocolate. While I am not a dietitian, I can give you a general idea based on the exact ingredient quantities used in this recipe. Keep in mind, this is just for one cookie, based on a yield of about two dozen.
- Serving Size: 1 cookie
- Calories: 220
- Fat: 13g
- Saturated Fat: 8g
- Carbohydrates: 25g
- Sugar: 20g
- Protein: 3g
- Sodium: 150mg
Remember, this is an estimate! The actual sugar and fat content can shift slightly depending on the brand of butter or the exact type of chocolate chips you decide to use in your ultimate chocolate chip cookies. Enjoy them, and don’t worry too much about the numbers!
Share Your Perfect Chocolate Chip Cookie Experience
I really, truly hope these cookies bring you as much joy as they bring to my kitchen. They are the result of years of testing and tweaking to get that perfect bakery snap on the edge and that molten middle we all crave!
I would love to know how your batch turned out! Did you chill the dough overnight? Did you press extra chips on top like I suggested? Please feel free to leave a rating below—five stars if you agree these are the **best chocolate chip recipe** ever! And share your favorite chocolate pairings in the comments; I’m always looking for new inspiration for my next holiday baking session!
Estimated Nutritional Data for One Chocolate Chip Cookie
I always get asked about the breakdown for these beauties, especially since we are using brown butter and a generous amount of chocolate. While I am not a dietitian, I can give you a general idea based on the exact ingredient quantities used in this recipe. Keep in mind, this is just for one cookie, based on a yield of about two dozen.
- Serving Size: 1 cookie
- Calories: 220
- Fat: 13g
- Saturated Fat: 8g
- Carbohydrates: 25g
- Sugar: 20g
- Protein: 3g
- Sodium: 150mg
Remember, this is an estimate! The actual sugar and fat content can shift slightly depending on the brand of butter or the exact type of chocolate chips you decide to use in your ultimate chocolate chip cookies. Enjoy them, and don’t worry too much about the numbers!
Share Your Perfect Chocolate Chip Cookie Experience
I really, truly hope these cookies bring you as much joy as they bring to my kitchen. They are the result of years of testing and tweaking to get that perfect bakery snap on the edge and that molten middle we all crave!
I would love to know how your batch turned out! Did you chill the dough overnight? Did you press extra chips on top like I suggested? Please feel free to leave a rating below—five stars if you agree these are the **best chocolate chip cookie recipe** ever! And share your favorite chocolate pairings in the comments; I’m always looking for new inspiration for my next holiday cookie baking inspiration session.
PrintUltimate Brown Butter Bakery-Style Chocolate Chip Cookies
Make thick, chewy chocolate chip cookies with crispy edges using the deep flavor of brown butter for a bakery-quality result at home.
- Prep Time: 20 min
- Cook Time: 12 min
- Total Time: 2 hours 32 min
- Yield: About 2 dozen cookies
- Category: Dessert
- Method: Baking
- Cuisine: American
- Diet: Vegetarian
Ingredients
- 1 cup (2 sticks) unsalted butter
- 1 cup packed light brown sugar
- 1/2 cup granulated sugar
- 2 large eggs
- 1 tablespoon vanilla extract
- 2 1/4 cups all-purpose flour
- 1 teaspoon baking soda
- 1 teaspoon salt
- 1 1/2 cups semi-sweet chocolate chips
- 1/2 cup milk chocolate chunks
Instructions
- Melt the butter in a saucepan over medium heat. Continue cooking, stirring occasionally, until the butter foams, then brown bits form at the bottom and it smells nutty. Pour the brown butter into a heatproof bowl and let it cool for 15 minutes.
- In a large bowl, whisk the cooled brown butter with the brown sugar and granulated sugar until fully combined.
- Beat in the eggs one at a time, mixing well after each addition. Stir in the vanilla extract.
- In a separate bowl, whisk together the flour, baking soda, and salt.
- Gradually add the dry ingredients to the wet ingredients, mixing on low speed until just combined. Do not overmix.
- Fold in the chocolate chips and chunks.
- Cover the dough and chill in the refrigerator for at least 2 hours, or preferably overnight. Chilling helps achieve the thick texture.
- Preheat your oven to 375 degrees F. Line baking sheets with parchment paper.
- Scoop rounded tablespoons of dough onto the prepared sheets, spacing them about 3 inches apart. For extra thick cookies, press a few extra chips onto the top of each dough ball.
- Bake for 10 to 13 minutes, or until the edges are golden brown and the centers still look slightly soft.
- Let the cookies cool on the baking sheet for 5 minutes before transferring them to a wire rack to cool completely.
Notes
- For the best texture, chill the dough for a minimum of 2 hours. This prevents spreading.
- If you want extra gooey centers, slightly underbake the cookies by one minute.
- Use a mix of chocolate chips and chunks for varied melt and texture throughout the cookie.
Nutrition
- Serving Size: 1 cookie
- Calories: 220
- Sugar: 20g
- Sodium: 150mg
- Fat: 13g
- Saturated Fat: 8g
- Unsaturated Fat: 5g
- Trans Fat: 0.1g
- Carbohydrates: 25g
- Fiber: 1g
- Protein: 3g
- Cholesterol: 45mg