

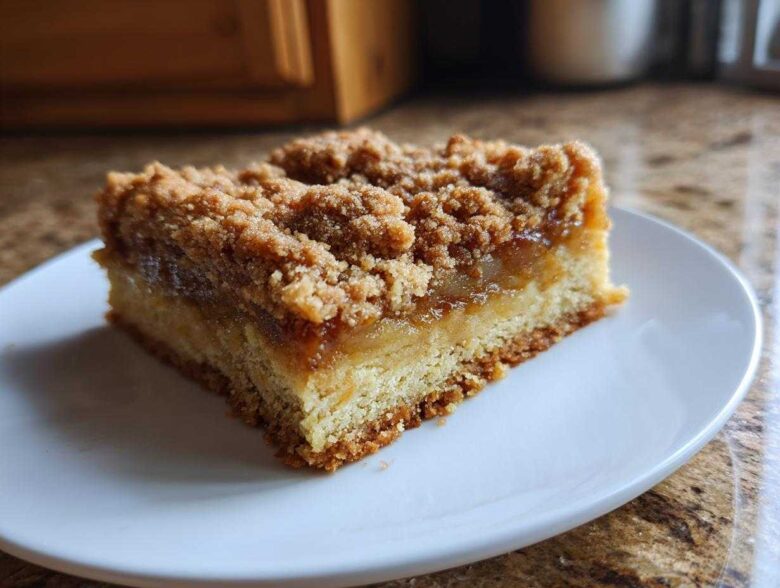
Ugh, I love a proper, double-crust apple pie, I really do. But let’s be honest, rolling out that perfect lattice, blind-baking the bottom, and praying it doesn’t leak apple juice all over my oven door? It’s stressful! That’s why I finally threw in the towel on my traditional pie schedule and developed what I truly believe is the best shortcut in baking: the ultimate easy apple pie bars.
These bars give you everything you crave—that buttery, crumbly crust, that warm spiced filling, and that lovely little crumble on top—all baked neatly in a single pan. Seriously, these are easier than tackling a full pie, and they are far more portable for potlucks. I first made these when I realized I wanted to bring a dessert to a neighborhood picnic but only had about an hour before I needed to leave. They were a total lifesaver, and now, these are my go-to comfort food apple bars!
Why You Will Love These Easy Apple Pie Bars Recipe
Honestly, making these is just pure joy—less stress, more snacking! If you’re looking for that perfect fall bake without the drama of a full pie, trust me, these are your answer.
- They are genuinely easier than apple pie recipe! No tricky rolling or lattice work required, just mix, press, and bake.
- The crust is made from scratch and tastes just like a rich, buttery apple pie bars shortbread cookie—absolute heaven.
- Perfectly portioned, making them wonderfully portable apple treats for any gathering or bake sale.
- That incredible apple pie bars with streusel topping adds the perfect crunchy texture contrast to the soft fruit filling.
- You get all the warm, cozy spice you expect from your favorite pie in these flavor-packed apple cinnamon bars.
- You can get these wonderful shortbread apple bars into the oven fast, making them a go-to no fuss apple pie solution.
We want these flaky apple squares to be your new favorite simple dessert, too!
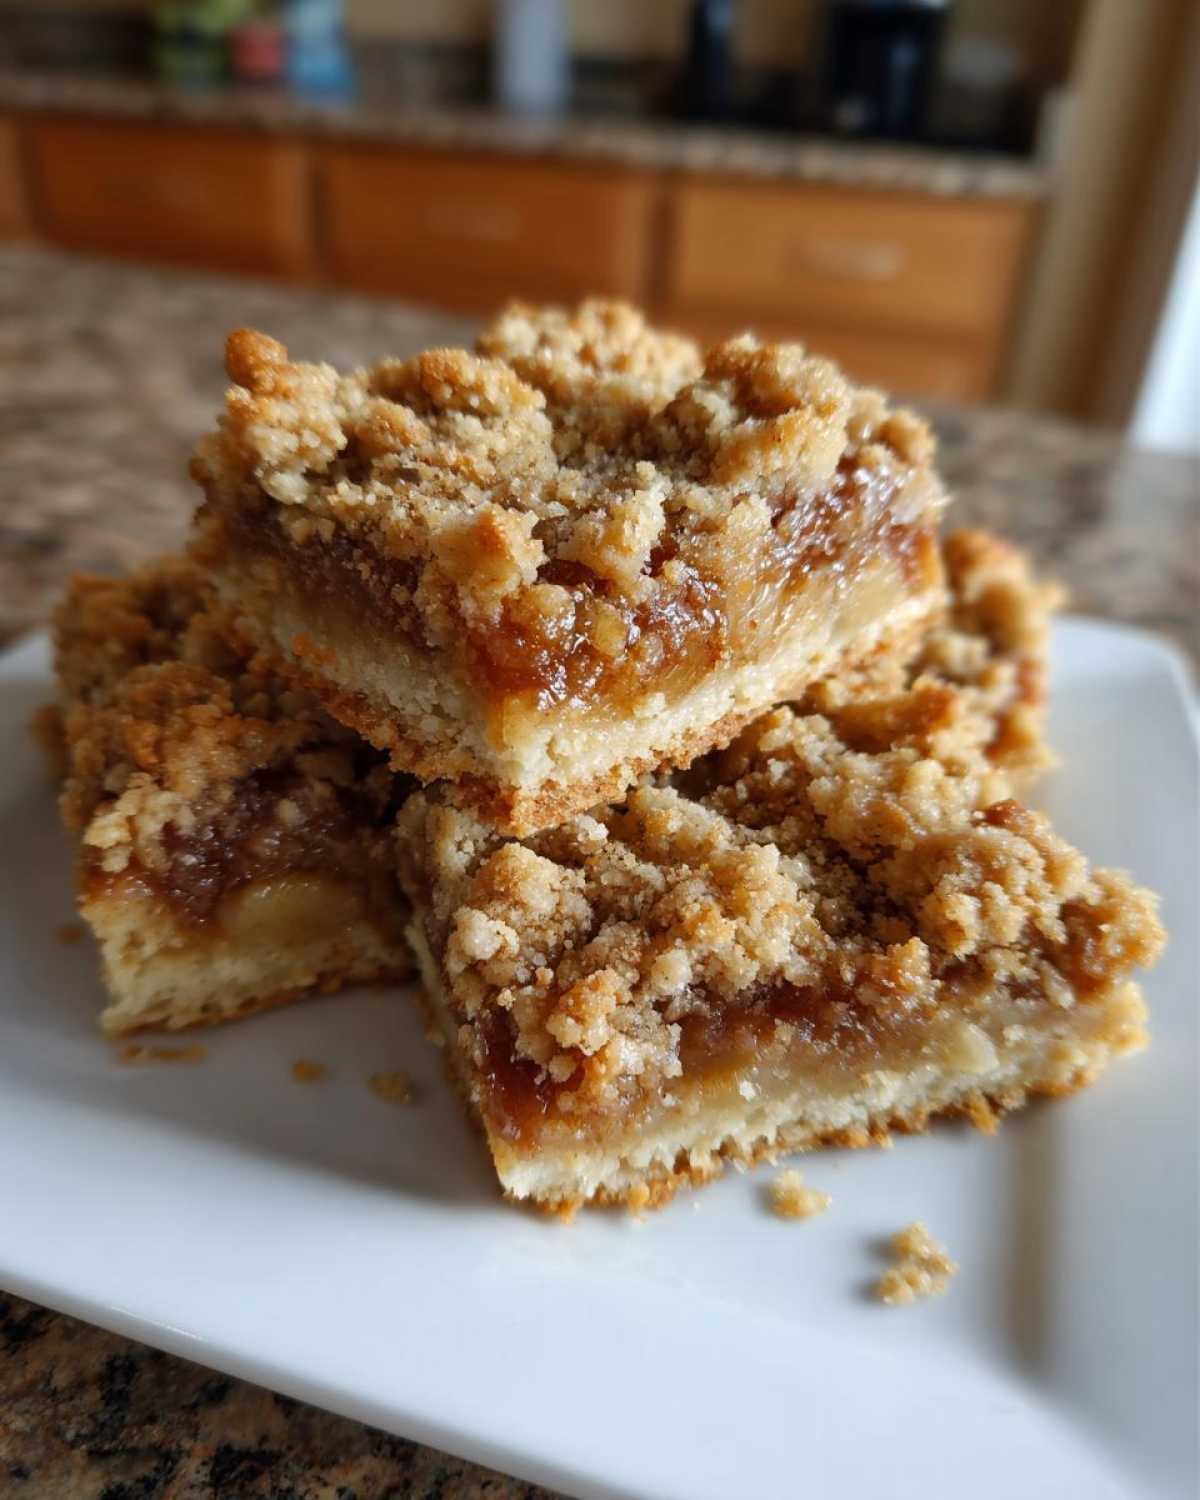
Gathering Ingredients for Your Buttery Apple Pie Bars
Alright, let’s talk about what we need to make these glorious buttery apple pie bars happen. Since the crust uses butter and flour almost like a shortbread cookie dough, you absolutely need to measure those ingredients precisely. Don’t eyeball the flour for the base, or it’ll crumble apart when you try to lift it out!
For the apples, I insist you use Granny Smith—they hold their shape and give you that perfect tartness to cut through the sweetness. Make sure everything is prepped before you start mixing the dough because once the butter hits the sugar, time starts ticking! Here are the ingredients you’ll need:
- 1 cup unsalted butter, softened
- 1 cup granulated sugar
- 2 cups all-purpose flour
- 1/2 teaspoon salt
- 1 teaspoon baking powder
- 1 large egg
- 1 teaspoon vanilla extract
- 4 medium Granny Smith apples, peeled, cored, and diced
- 1/2 cup packed brown sugar
- 2 tablespoons all-purpose flour
- 1 teaspoon ground cinnamon
- 1/4 teaspoon ground nutmeg
- 2 tablespoons lemon juice
- 1/2 cup rolled oats (for topping)
- 1/4 cup granulated sugar (for topping)
- 1/4 cup all-purpose flour (for topping)
- 1/2 teaspoon ground cinnamon (for topping)
- 2 tablespoons cold unsalted butter, cut into small pieces (for topping)
See? Nothing too exotic, but the quality of those simple things really makes a difference in these apple pie dessert bars!
Step-by-Step Guide to Making Perfect Apple Pie Bars with Streusel Topping
Okay, here is where the magic happens! I’ve broken this down into manageable chunks because even though these are easy, we still need that perfect structure for our sheet pan apple pie bars. Following the order I use makes sure nothing gets overworked and the layers set up beautifully.
Creating the Buttery Shortbread Apple Pie Bars Crust
First things first: get your oven warmed up to 350°F (175°C). Get a 9×13 inch pan ready by lining it with parchment paper, making sure you leave plenty of overhang on the sides—that’s your built-in handle for lifting everything out later! Now, grab that softened butter and the cup of sugar. Cream them together until they look light and fluffy. Then, beat in your egg and vanilla. In a separate bowl, whisk your flour, salt, and baking powder together. Slowly add the dry stuff to the wet stuff—only until it just comes together into a soft dough. Don’t overmix! Take about two-thirds of this dough and press it firmly into the bottom of your prepared pan. Seriously press it down well; that’s going to be our crust. Take the remaining one-third of the dough and set it aside for the topping.
Mixing the Spiced Apple Filling for Your Apple Pie Bars
Time for the filling! You want those diced apples to be swimming in spice. In a bowl, toss those apples with the brown sugar, those two tablespoons of flour (which helps thicken the juices!), the cinnamon, nutmeg, and a splash of lemon juice. The lemon keeps things bright and stops browning. Give it a good toss so every apple piece gets coated in that gorgeous spice mix. Once everything looks coated, spread that apple mixture evenly right on top of your pressed shortbread crust layer.
Assembling the Apple Crumble Bars Topping
This is my favorite part because it involves *two* toppings! First, in a separate little bowl, whisk together the oats, the tiny bit of extra sugar, flour, and cinnamon for the streusel. Use your fingers or a pastry blender to cut in those two tablespoons of very cold butter until it looks like coarse crumbs. Then, go back to that reserved dough you set aside—just crumble that reserve dough right on top of the apples. After the dough crumbles are scattered, sprinkle that oaty streusel mix all over the top. You get this amazing structural richness from the dough crumbs and a nice delicate crunch from the oat topping!
Baking and Cooling Sheet Pan Apple Pie Bars
Pop the pan into that 350°F oven and bake for about 40 to 45 minutes. You’re looking for that topping to be deeply golden brown and you should see the apple filling bubbling up happily around the edges. Now, here’s the hardest part: you *must* let these cool completely! I know, the smell is torture, but if you try to cut them warm, they turn into a gooey mess. Once they are completely cooled—maybe two hours, or pop them in the fridge for an hour if you’re impatient—use those parchment overhangs to lift the entire slab onto a cutting board. Then you can cut perfectly neat flaky apple squares!
Expert Tips for Perfect Apple Pie Bars Every Time
Even though these are supposed to be the easy route to apple goodness, a few little tricks can take your apple crumble bars from good to legendary. I learned these the hard way, usually by having a beautiful dessert turn into a pile of mush when I tried to serve it!
First, let’s talk about apple choice outside of our beloved Granny Smith. While Granny Smiths are my non-negotiable recommendation for their tartness, if you want a slightly sweeter bar, you can substitute half of them with Honeycrisp or Gala. Just make sure whatever you pick is firm; soft, mealy apples will disappear into sauce instead of giving you those great little chunks in your filling.
Preventing a Soggy Bottom
This is the classic enemy of any bar or pie! To prevent that crust from getting completely saturated by those hot, juicy apples, you have to make sure your butter for the topping is ice cold—I mean, almost frozen. When you cut that cold butter into the streusel mix, it creates little pockets that melt slowly in the hot oven. These pockets release steam, essentially creating a little barrier between the apples and the crust below. That barrier keeps things perfectly flaky, not soggy!
Don’t Skip the Chilling Time
When you’re pressing the base dough into the pan, try to work quickly so the butter in the dough stays cool. If your kitchen is warm, the butter gets soft, and you end up with a dense, heavy base instead of a flaky apple squares foundation. If you notice the dough getting greasy while you press it, scrape it into the fridge for ten minutes to firm up before proceeding. A chilled base bakes up much nicer!
The Secret to Perfect Cutting
I mentioned this before, but it bears repeating because it’s the difference between beautiful squares and crumbling disappointment. You have to let them cool completely, preferably on a wire rack, before attempting the knife. If you’re in a huge rush, chill the *entire cooled pan* in the refrigerator for at least an hour after it comes out of the oven. Cold butter sets up hard, which means clean, beautiful cuts every time.
Storage and Make Ahead Apple Bars Instructions
One of the truly wonderful things about these make ahead apple bars is that they are actually better the next day! Seriously, don’t even bother trying to eat them warm right after they’ve been cut. The flavors meld together overnight, and the apples settle perfectly.
When it comes to storing them, keep them covered tightly. You can leave them right on the counter at room temperature for up to three days. I usually use an airtight container, or sometimes I just cover the whole cut pan tightly with plastic wrap and then foil. The shortbread crust and streusel topping are sturdy enough that they don’t get soggy quickly!
If you made a double batch (and trust me, you should), you can absolutely freeze them. Cut the bars into individual squares first. Then, stack the squares in a freezer-safe container, making sure to put a small piece of parchment paper between each layer so they don’t stick together. They freeze beautifully for about two months. When you want one, just pull it out of the freezer about an hour before you want to eat it, and it’ll be ready to go!
If you do choose to reheat them slightly—maybe you’re serving them à la mode with ice cream—don’t use the microwave unless you absolutely have to. A quick blast in a toaster oven for about three minutes at 300°F will warm them through nicely and give the topping a little extra crispness without making the crust too soft.
Variations for Your Apple Cinnamon Bars
While the classic apple pie bars recipe is pretty much perfection in my book, I love tinkering, especially when it comes to topping them. It’s so easy to swap things up depending on what I have in the pantry or what mood I’m in! These bars are robust enough to handle a few extra goodies, which is what makes them such a great base recipe.
Adding Nuts to the Streusel Topping
If you want an extra layer of crunch and a slightly richer flavor profile, throwing nuts into that streusel topping is the way to go. My favorite addition is pecans—they have this warm, almost buttery flavor that just sings next to the cinnamon.
Here’s the deal: Take about half a cup of chopped pecans or walnuts. Mix them in with your streusel ingredients (the oats, flour, sugar, and spice) right before you cut in the cold butter. Don’t chop them too fine; keep them chunky so you get a nice texture contrast between the crumbs and the nuts.
Drizzling with Salted Caramel
Okay, if you really want to take these cinnamon dessert bars to “showstopper” status without adding a ton of extra work, you need to try the caramel drizzle. This is a fantastic way to elevate them for a special occasion. Remember how I mentioned those salted caramel apple bars in the notes? Here’s how you pull it off.
Wait until the bars are mostly cooled—say, about 30 minutes after they come out of the oven. They need to be warm, but not hot, or the caramel will just soak in completely. Take a jar of good quality salted caramel sauce and just drizzle it back and forth across the top. You don’t need much! Just a zig-zag pattern is enough to add that salty-sweet punch that complements the tart apple filling perfectly. Let it set up for another 20 minutes before you cut them.
Vanilla Glaze Instead of Crumble
Sometimes, you just don’t want the texture of the streusel topping, or maybe you want something smoother to drizzle over the top. If you’re skipping the crumble topping altogether (meaning you’ll press *all* the dough for the base layer), you have to substitute that missing texture somewhere, or the top might burn!
So, if you skip the streusel: Press *all* the dough into the base and put the apple filling on top. Bake that naked apple layer until it’s almost done—testing it around 35 minutes. Then, make a simple powdered sugar glaze: whisk powdered sugar with a tiny bit of milk and a splash of vanilla until it’s pourable. Drizzle that over the bars and put them back in the oven for just 3 to 5 minutes until the glaze sets up slightly. Instant glazed apple pie bars!
Frequently Asked Questions About These Portable Apple Treats
Can I use different apples instead of Granny Smith for these apple pie bars?
You absolutely can! While I really, really recommend Granny Smith because they stay firm and offer that essential tartness that cuts through the rich, buttery apple pie bars crust, you have options. If you want a sweeter bar, use Honeycrisp or Fuji apples. The key is firmness. If you use a softer apple, like McIntosh, they might turn to applesauce in the oven, which definitely changes the texture of your final flaky apple squares. I suggest using a mix—say, two Granny Smiths and two Fujis—for the best balance of flavor and structure!
I love the streusel, but what if I want to make these even quicker? Can I skip the topping?
You can, but I have to warn you, you lose a lot of the fun texture that makes these “bars” instead of just a baked fruit casserole! If you skip the streusel topping, you are essentially making a quick-bake apple crisp topping on a shortbread base. If you decide to skip it, you need to press all of your dough into the bottom crust layer. Because the top is now just apples, you should cover the pan loosely with foil for the first 25 minutes of baking. This stops the apples from scorching before they are fully cooked through. They’ll still be delicious cinnamon dessert bars, but they won’t have that signature crunch!
What is the trick to getting those perfectly clean cuts on my apple pie bars?
This is the question I get most often! Clean cuts are all about temperature control—it’s crucial for any bar cookie, especially those made with lots of butter! You must, must, *must* let the bars cool completely on a wire rack first. If you try cutting them while they are even slightly warm, the butter in the crust will be too soft, and you will end up with sticky, pulled-apart edges. The best trick, especially if you’re in a hurry, is chilling them completely in the fridge for about an hour after they’ve reached room temperature. Cold butter is hard butter, and hard butter slices like a dream. This makes them super neat and portable apple treats!
Can these apple pie squares be made ahead of time?
Yes, these are fantastic for making ahead! They actually taste better the next day once those apple spices have had time to sink into the crust and filling. You can store these covered tightly at room temperature for up to three days. They don’t need refrigeration unless your kitchen is blazing hot. If you want to make them even further ahead, wrap the cooled, uncut slabs tightly in plastic wrap and foil and freeze them for up to two months. They thaw perfectly on the counter!
Understanding the Nutrition of These Comfort Food Apple Bars
Now, I want to be super clear here: these are honestly a treat! We’re using a real, buttery shortbread crust, brown sugar, and all those delicious apples, so they aren’t exactly a side salad. But hey, knowing what’s in your food is important, right? I always preach realism in the kitchen, and these apple bars fit the bill for a truly satisfying indulgence.
The numbers below are just estimates based on the ingredients listed in the recipe—so if you decide to add a hefty drizzle of caramel or use a different type of apple, these will shift a little. For full details and legal stuff, you can always check out our official disclaimer page.
Here’s the general breakdown per serving (we usually cut ours into 16 squares, which makes for a good-sized treat):
- Calories: Around 280
- Fat: About 15g (Remember, most of that is the good butter doing its job in the crust!)
- Carbohydrates: Roughly 35g
- Protein: About 3g
As you can see, they pack a punch of energy when you need a little pick-me-up! They are definitely comfort food apple bars meant to be enjoyed as a dessert or special snack, and I wouldn’t have them any other way.
Share Your Homemade Apple Pie Squares
Now that you’ve hopefully got a pan of these amazing apple pie bars cooling on your counter, I absolutely want to hear about it! Did you try the salted caramel drizzle? Did the streusel topping stay perfectly crunchy? Don’t be shy!
The best compliment you can give me is trying out the recipe and telling me how it went. Please leave a rating for this easier than apple pie recipe right down below in the comments section. Five stars if you loved that buttery crust, but even if you docked a star, tell me why so I can perfect it for next time!
And oh my gosh, if you took a picture of your finished homemade apple pie squares—maybe they are sitting on your porch ready for a fall day—please tag me on social media! Seeing your bakes makes all the work worth it. Enjoy every single bite of these!
PrintUltimate Easy Apple Pie Bars with Buttery Shortbread Crust
Make these simple apple pie bars featuring a buttery shortbread base, spiced apple filling, and a cinnamon streusel topping. They are easier to serve than a traditional pie.
- Prep Time: 25 min
- Cook Time: 45 min
- Total Time: 70 min
- Yield: 16 servings
- Category: Dessert
- Method: Baking
- Cuisine: American
- Diet: Vegetarian
Ingredients
- 1 cup unsalted butter, softened
- 1 cup granulated sugar
- 2 cups all-purpose flour
- 1/2 teaspoon salt
- 1 teaspoon baking powder
- 1 large egg
- 1 teaspoon vanilla extract
- 4 medium Granny Smith apples, peeled, cored, and diced
- 1/2 cup packed brown sugar
- 2 tablespoons all-purpose flour
- 1 teaspoon ground cinnamon
- 1/4 teaspoon ground nutmeg
- 2 tablespoons lemon juice
- 1/2 cup rolled oats (for topping)
- 1/4 cup granulated sugar (for topping)
- 1/4 cup all-purpose flour (for topping)
- 1/2 teaspoon ground cinnamon (for topping)
- 2 tablespoons cold unsalted butter, cut into small pieces (for topping)
Instructions
- Preheat your oven to 350°F (175°C). Line a 9×13 inch baking pan with parchment paper, leaving an overhang on the sides for easy removal.
- Prepare the crust: In a large bowl, cream together the 1 cup softened butter and 1 cup granulated sugar until light and fluffy.
- Beat in the egg and vanilla extract until just combined.
- In a separate bowl, whisk together 2 cups flour, salt, and baking powder. Gradually add the dry ingredients to the wet ingredients, mixing until a soft dough forms.
- Press two-thirds of the dough evenly into the bottom of the prepared pan to form the crust. Reserve the remaining one-third of the dough for the topping.
- Prepare the filling: In a medium bowl, combine the diced apples, brown sugar, 2 tablespoons flour, 1 teaspoon cinnamon, nutmeg, and lemon juice. Toss gently to coat the apples.
- Spread the apple filling evenly over the crust layer in the pan.
- Prepare the streusel topping: In a small bowl, combine the rolled oats, 1/4 cup sugar, 1/4 cup flour, and 1/2 teaspoon cinnamon. Cut in the 2 tablespoons cold butter using a pastry blender or your fingers until the mixture resembles coarse crumbs.
- Crumble the reserved one-third of the dough over the apple filling. Then, sprinkle the streusel mixture over the top.
- Bake for 40 to 45 minutes, or until the topping is golden brown and the filling is bubbly.
- Let the bars cool completely in the pan on a wire rack before lifting them out using the parchment overhang. Cut into squares.
Notes
- For a salted caramel variation, drizzle melted caramel sauce over the bars after they have cooled slightly.
- You can make these bars one day ahead and store them covered at room temperature.
- Use firm apples like Granny Smith or Honeycrisp for the best texture in the filling.
Nutrition
- Serving Size: 1 bar
- Calories: 280
- Sugar: 25g
- Sodium: 110mg
- Fat: 15g
- Saturated Fat: 9g
- Unsaturated Fat: 6g
- Trans Fat: 0g
- Carbohydrates: 35g
- Fiber: 2g
- Protein: 3g
- Cholesterol: 45mg